Cuphead’s notorious difficulty makes it a Max Fleischer-flavored hellscape. The bosses are fierce and furious, and without some guidance, they can be a truly bitter tea to swallow. That’s where this guide comes in. Now that you’ve got all the contracts in your grubby fists, it’s time to give the devil his due! Of course, it won’t be that simple, as his #1, King Dice, isn’t going to just let you waltz into his office without your due harassment. But with some persistence and this guide, you’ll be beating back the devil in no time.

King Dice
I don’t want to alarm you, but King Dice is a bit of a doozy. Fighting him in his casino is like a boss rush game INSIDE a boss rush game. Potentially, you can fight up to nine different mini bosses before you get to lay your fingers on the man himself. It’s wildly improbable that you’ll fight all nine of his minions, but I got you scared for a second, didn’t I?
Once you enter the King’s casino, you’ll be standing on a game board, with the Gamest in the Land looming over you. He will spin a big pink die right above the board, and when you parry it, it will stop on a number between one and three. The number you get determines how many spaces the purple arrow moves along the track in the background. Once you get to “Fin” all the way on the right, you’ll get to deal with Dice, once and for all.
Up until then, though, you’ll have to roll carefully, and plow through a list of some tough customers. Individually, none of them are harder than any boss you’ve encountered already. But the attritive nature of this long fight can get the best of us. I don’t know who you will draw in your journey, but when you land on that number, we can help you through it.
1. Tipsy Troop
A trio of adult beverages what to give you more than just a hangover. Each glass has their own attack and their own hitpoints.
The rum (or whiskey?) on the rocks is a clumsy bumpkin, and will occasionally fall over, spilling his contents all over the ground. You’ll have to jump over this. The martini will fire up to two olive bats at you. They fly around and follow you, but they can be shot down. Finally, the decanter will fire whisky from its bottle into the air. After a brief delay, it will rain down on you in an easy-to-avoid column of booze.
Individually, these attacks aren’t all that bad. When they happen simultaneously, they become a real chore. Thankfully, you can kill each glass individually, to gradually make the fight more manageable. I’d try to aim for the martini first, as she has the most annoying attack and moderate health. Since the decanter’s attack is so easy to dodge, and he has the highest health, I’d save him for last.
2. Chips Bettigan
Bettigan is a literal stack of chips with a cowboy hat on. He has one attack: separating himself and passing from one side of the screen to the other. Jump, duck, and dodge his advance, and shoot him when he is re-stacked, and this shouldn’t be a fight that gives you much trouble
3. Mister Wheezy
Mister Wheezy is a giant cigar, who can teleport between two ash trays, which also happen to be your platforms. In between these are impish cigarettes who fly upwards to hinder your jumping from spot to spot. When Wheezy is corporeal, he will spit looping fireballs at you. They take their time getting to you, but don’t get too comfortable, they will catch up to you.
4. Pip and Dot
So Pip and Dot are two whole people stuck together as a domino. As they swing above the stage, they leave you to deal with the nonsense of perils below.
To your left is a large spike wall that doesn’t let you move to far in that direction. Not a problem, minus the conveyor belt of a floor, that is constantly moving you towards the wall. Also not that big a deal, just keep running right, right? Wrong, because you’ll need to avoid the spikes on the floor, too. Additionally, Pip and Dot will be accosting you, shooting 20-sided dice at your, as well as unleashing some winged domino bird that flaps around and makes avoiding all of the previous hazards that much more difficult.
5. Hopus Pocus
Hopus is a big bunny magician hiding in a rabbit, looking to bewitch you away. He has a pair of attacks, one of them involves summoning a ring of skulls that surround you. They spin for a bit, but will eventually close in around you. You’ll have to slip out in one of the spaces as they shrink. His other attack has his summon a bunch of card suits above or below the screen, that will rise up or fall down on you. There are a few that are parry-able, which will help you get out of danger relatively safely.
6. Phear Lap
Remember that time the Cuphead Isle III guide I told you you would be done with airplane fights? I lied. Potentially, you could land on this skeletal horse jockey. Luckily, he only has one real attack, as he floats in his little throne: tossing blue gift boxes at you. They will travel a distance, and they explode into a bunch of golden horse shoes. The shoes are easy to dodge, just make sure you aren’t too close to the box when it blows.
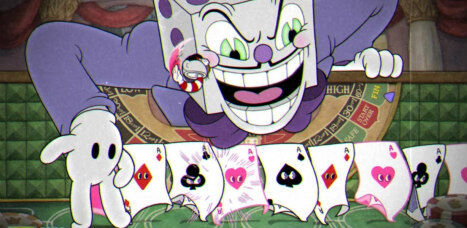
7. Pirouletta
A dancing roulette wheel gives you some grief on the seventh space. Pirouletta is a simple boss, really. She twirls back and forth on the map, and dodging her advance is the biggest challenge here. The chips in the center of the screen have to be parried to be flipped into a solid position that you can stand on. It’ll give you a high enough perch to hop over her. The chips have a short timer before going back to dormant, though. When she makes it to either side, Pirouletta spins in place, showering the stage with roulette balls. Be very careful here, because they are small and will catch you slipping.
8. Mangosteen
This floating Magic 8 Ball sees your death in it’s future. It will attempt to bring it to you with his only attack, which involves opening his mouth and spitting out a sort a rainbow orb at you. This is quite easy to dodge, but he’s not alone. Pouncing chalk blocks will hop along like Thwomps, attempting to stoically crush you with their bodies. They are equally easy to dodge.
9. Mister Chimes
With a pair of cymbals and bad intentions, this wind-up bear/monkey could very well be your last stop on the way to King Dice. And of course he is nuisance. He is being carried around the screen by a grabber claw, and though he can damage you on contact, he can’t be hurt while he is “inactive.” To activate him, you have to match a pair of the 12 cards that make up the background behind you. In order to flip them, you have to parry the glowing center jewels.
If you reveal a non-matching pair, he will move around the screen faster. When you find a match, Chimes will activate! When up and about, he will squawk and clang his cymbals, sending yellow music notes out in all directions. He will finally be target-able as well. So stay in motion, and after drawing all the pairs, you should have done enough damage to put him away.
The Man Himself
King Dice has one attack, but it’s a pretty good one. He will walk his hands on the board, and from them will march a hand of cards in single file. These cards are tall, and the march is long enough that a simple jump and air dodge wont be enough to avoid them. You will have to parry the pink cards shuffled among the troupe. Dice himself is a pretty easy target to head, and his head can be jumped into without taking damage. The key here is nailing the parry combos. It’s tougher than it looks, but easy to practice and master, if only it didn’t take so long to get to him.
You can truncate the journey if you get good at choosing the dice roll. With good timing, you can basically guarantee you’ll get the number you want, in which case you’ll want to basically plan out which fights your comfortable with, and mapping out the rolls ahead of time. The minimum you’ll absolutely have to fight is three.
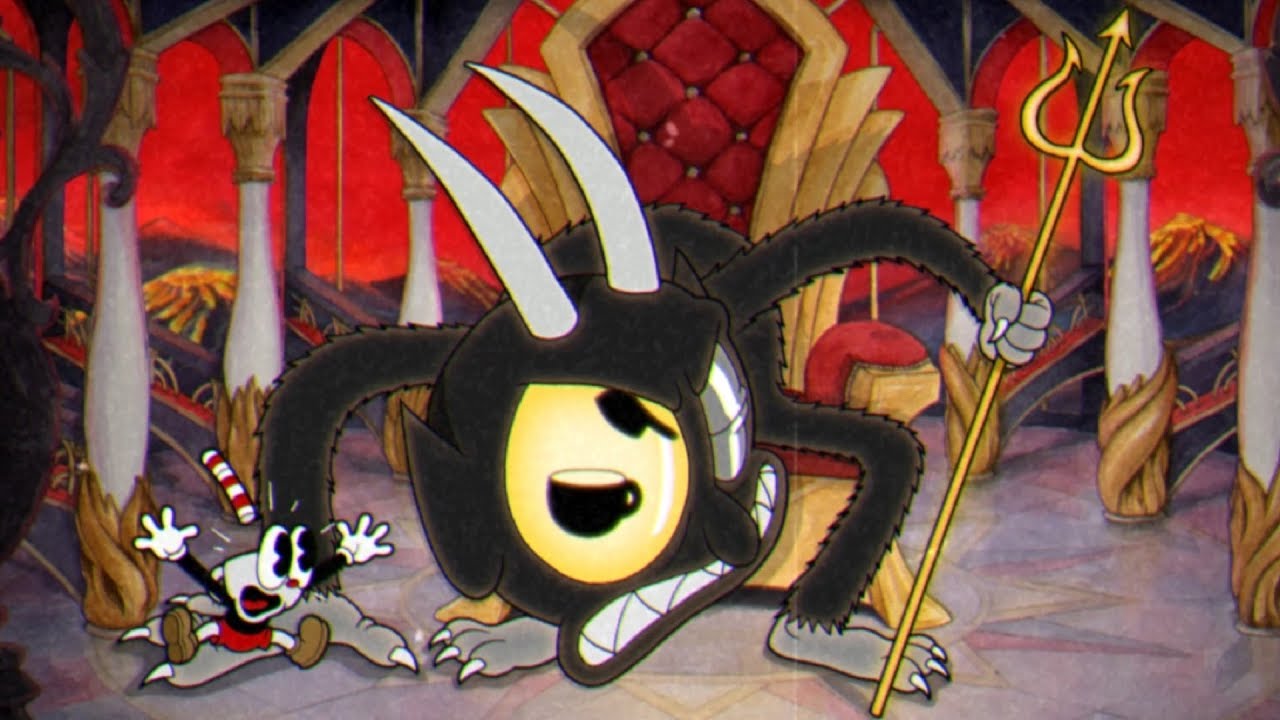
The Devil
First Phase
The Devil sits on his throne and watches you flail around to shoot him in the face. He has several forms that he takes in this phase, each with their own move. You’ll need to be on top of to keep up with this guy. His old stand by seems to be the Goat Form, where after growing big baphomet horns, he will extend his arms from the background to the fore in order to smash you in his clutches. Be sure to jump AND dash over this to get as much air time as possible, because this attack stays out for awhile.
He can also take the form of a Spider, where his body will grow more arms and his head will leap from his shoulders. The head itself is the spider, flopping around the screen for you to dodge. This is actually not to hard of a task, just get keep that dash handy.
In his Dragon Form, The Devil’s neck explodes into the sky, and swings back around to writhe across the screen a bit. There are voids under the waves that you’ll have to stay in to be safe from this one, but be sure to act quickly because you can get stuck.
He has another move, which involves him chanting some curse and conjuring fireballs to launch at you. While all these other attacks are happening, little devils are running out from behind his throne, and into the foreground to throw you off guard. They are kill-able, but can be a real pain.
Second Phase
The Devil’s skeleton will literally leap out of his skin and sink into a hole in the ground. Follow him down the hole, where you will land on one of many platforms floating in front of a giant version of his head. He has much fewer attacks in this form, but like the last, there is a persistent threat making everything harder. This time, its falling poker chips, that will force you to move from platform to platform rapidly.
Otherwise, stay clear of his eye bomb, which will appear in one of his eyes and exit his head via the corresponding ear. Either commit to parrying it away, or just run to the other side of the field. Decide quickly though, because they will explode. When his eyes converge into one big eye, it will launch a spinning battle axe at you. It’s easy to avoid, but is does travel fast, so stay frosty.
Third Phase
The Devil will rage, and two of the platforms will drop out, while the remaining begins to move around. In the place of the fallen platforms will flap two big purple bastards who will continuously shoot skulls at you. The Devil also spawns little pinwheel imps, that will spin into you if not dealt with. All the while, those flaming poker chips are still trying to squash you. It’s imperative that you keep moving, and clearing his little minions whenever you get the chance, because they provide the bulk of the chaos.
Fourth Phase
Two more platforms drop out, and now its just you and him. He will cry tears of blood, the droplets of which are parry-able. An important note to remember, because that damned flaming poker chip will still be falling at you, and with no other platforms around, you know where its going. It’s important to get into the rhythm of parrying yourself back on to the platform after jumping off of it, because its the only way around the poker chip rain safely. If there’s good news, its that this is his only attack, and once you fell him a final time, you’ve beaten Cuphead!
Revel in your victory, and if you need to know more, come on down to the Cuphead Wiki! Still working your way through the Inkwell Isles? Be sure to check out our guides for Inkwell Isle I, Inkwell Isle II, and Inkwell Isle III.