Hard West, CreativeForge’s dark western with XCOM-inspired turn based strategy elements, can be a tough game to mosey through. It can be as gritty and desolate as its setting suggests, what with all the banditry and paranormality running rampant. Here’s a few tips to keep your feet on the ground and your six shooter straight, courtesy of the Official Hard West Wiki.

1. Heat, Vision, and Subdue
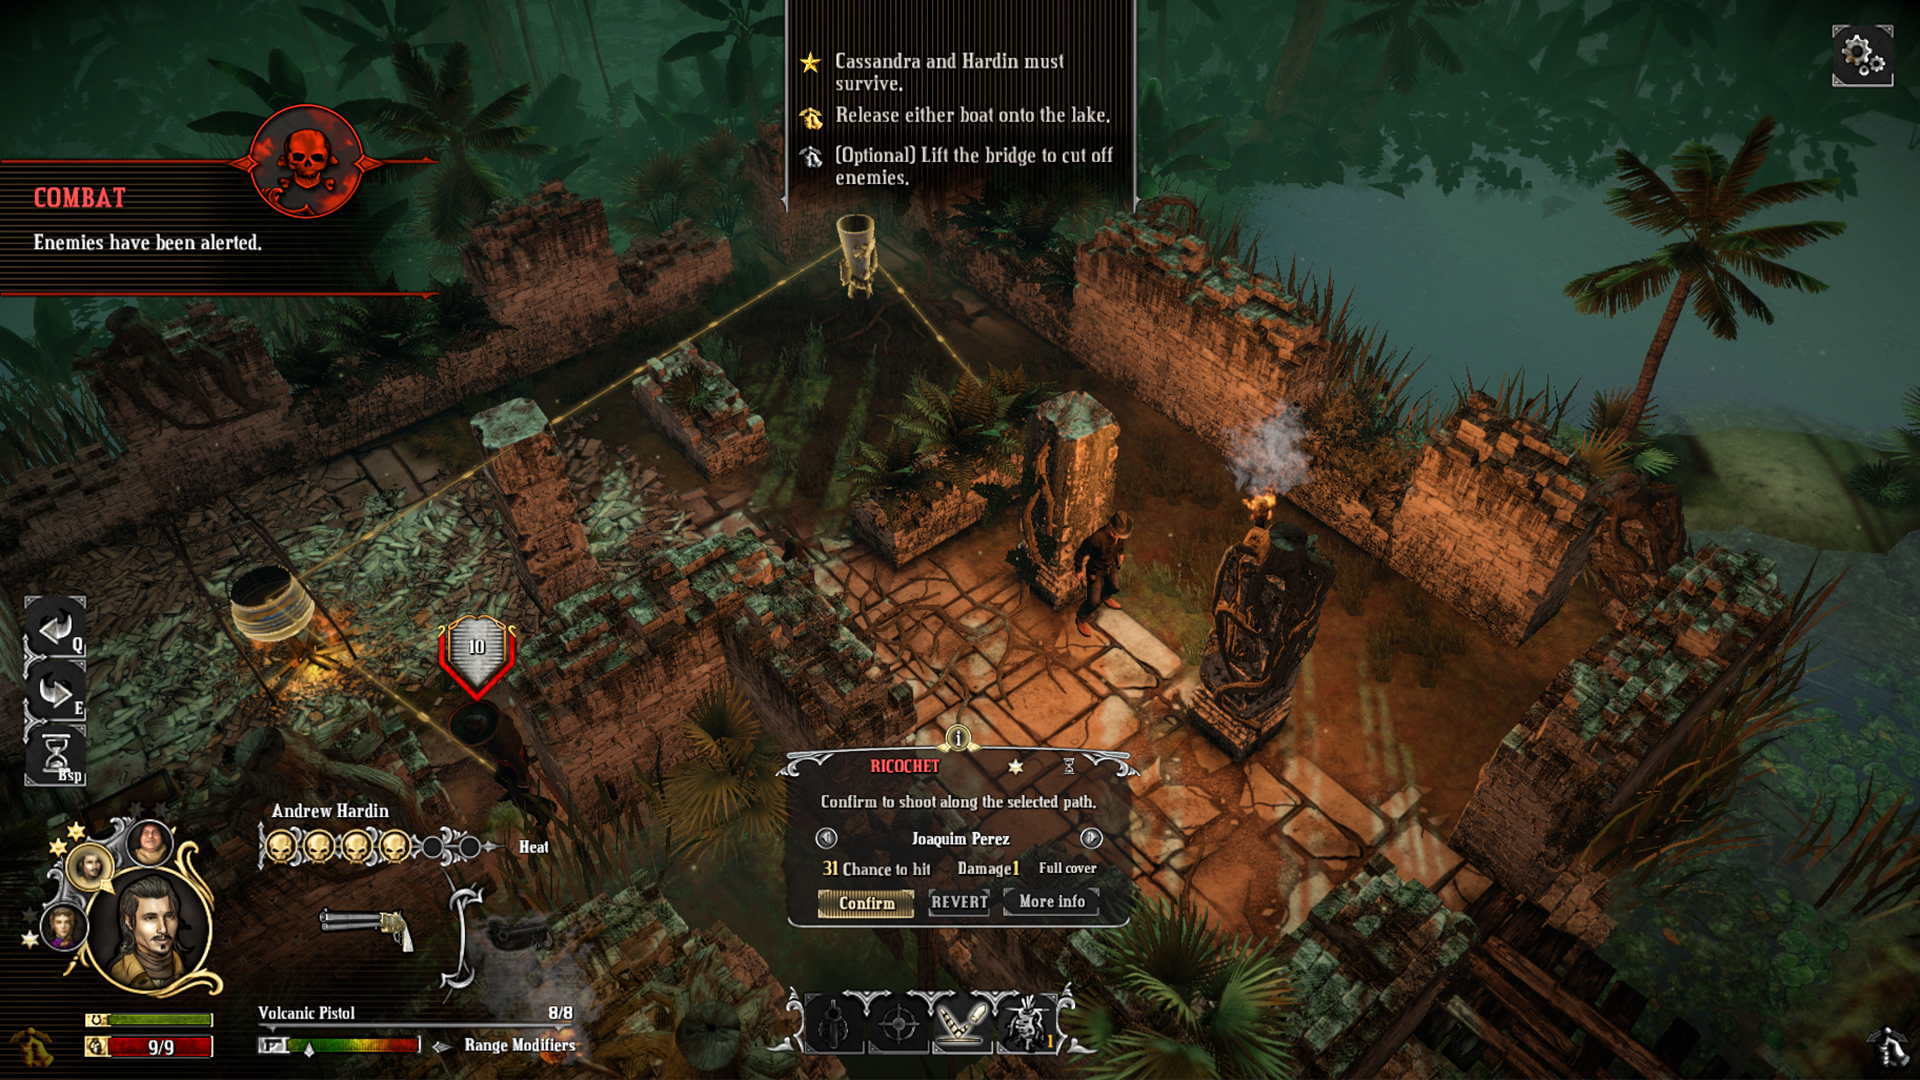
One of the biggest differences in the turn by turn action between Hard West and XCOM is the preparation phase. When a round starts, it doesn’t always start with guns blazing. More often, there is a sort of calm before the storm, where you characters are free to scout out a map, search for hidden objectives, and plan out your attack before the enemy even gets wind of you.
Staying out of sight is important in this phase. Hovering over enemies will show you a red vision cone, which dictates where they can see. If one of your characters idles in this cone too long, enemies will get suspicious and draw on you. A character’s Heat designates how much easier you are to detect when in this cone. Characters with more heat draw more attention, and certain actions can raise you heat level. In order to keep guards incapacitated without having to fire your very noisy gun, a character can subdue an enemy. This essentially holds them up for a series of turns, and renders their vision cone inert. If you don’t kill or subdue an enemy again before the counter runs out, the enemy will engage. Keeping the element of surprise as long as you can is key to making the most out of your first few turns.
2. Cover
If you can help it, you should be sticking behind cover ever single chance you get. Bullets are incredibly lethal in Hard West, and it will only take a shot or two to land on any given unit before they are out of the game. Luck, the finite but renewable stat that acts like a bullet buffer, can only get you so far. Cover not only reduces the enemy’s ability to hit you, but reduces the damage a shot will do to you should it get to you. There really is no substitute for survivability like a sturdy wall or an upturned table.
If you find that your enemy has entrenched themselves behind some solid cover, it may not be worth trading bullets over walls, but instead finding a flank. While flanking someone in cover, it removes any bonus cover would have added to being shot or the damage taken by being shot. Keep in mind, this can also happen to you.
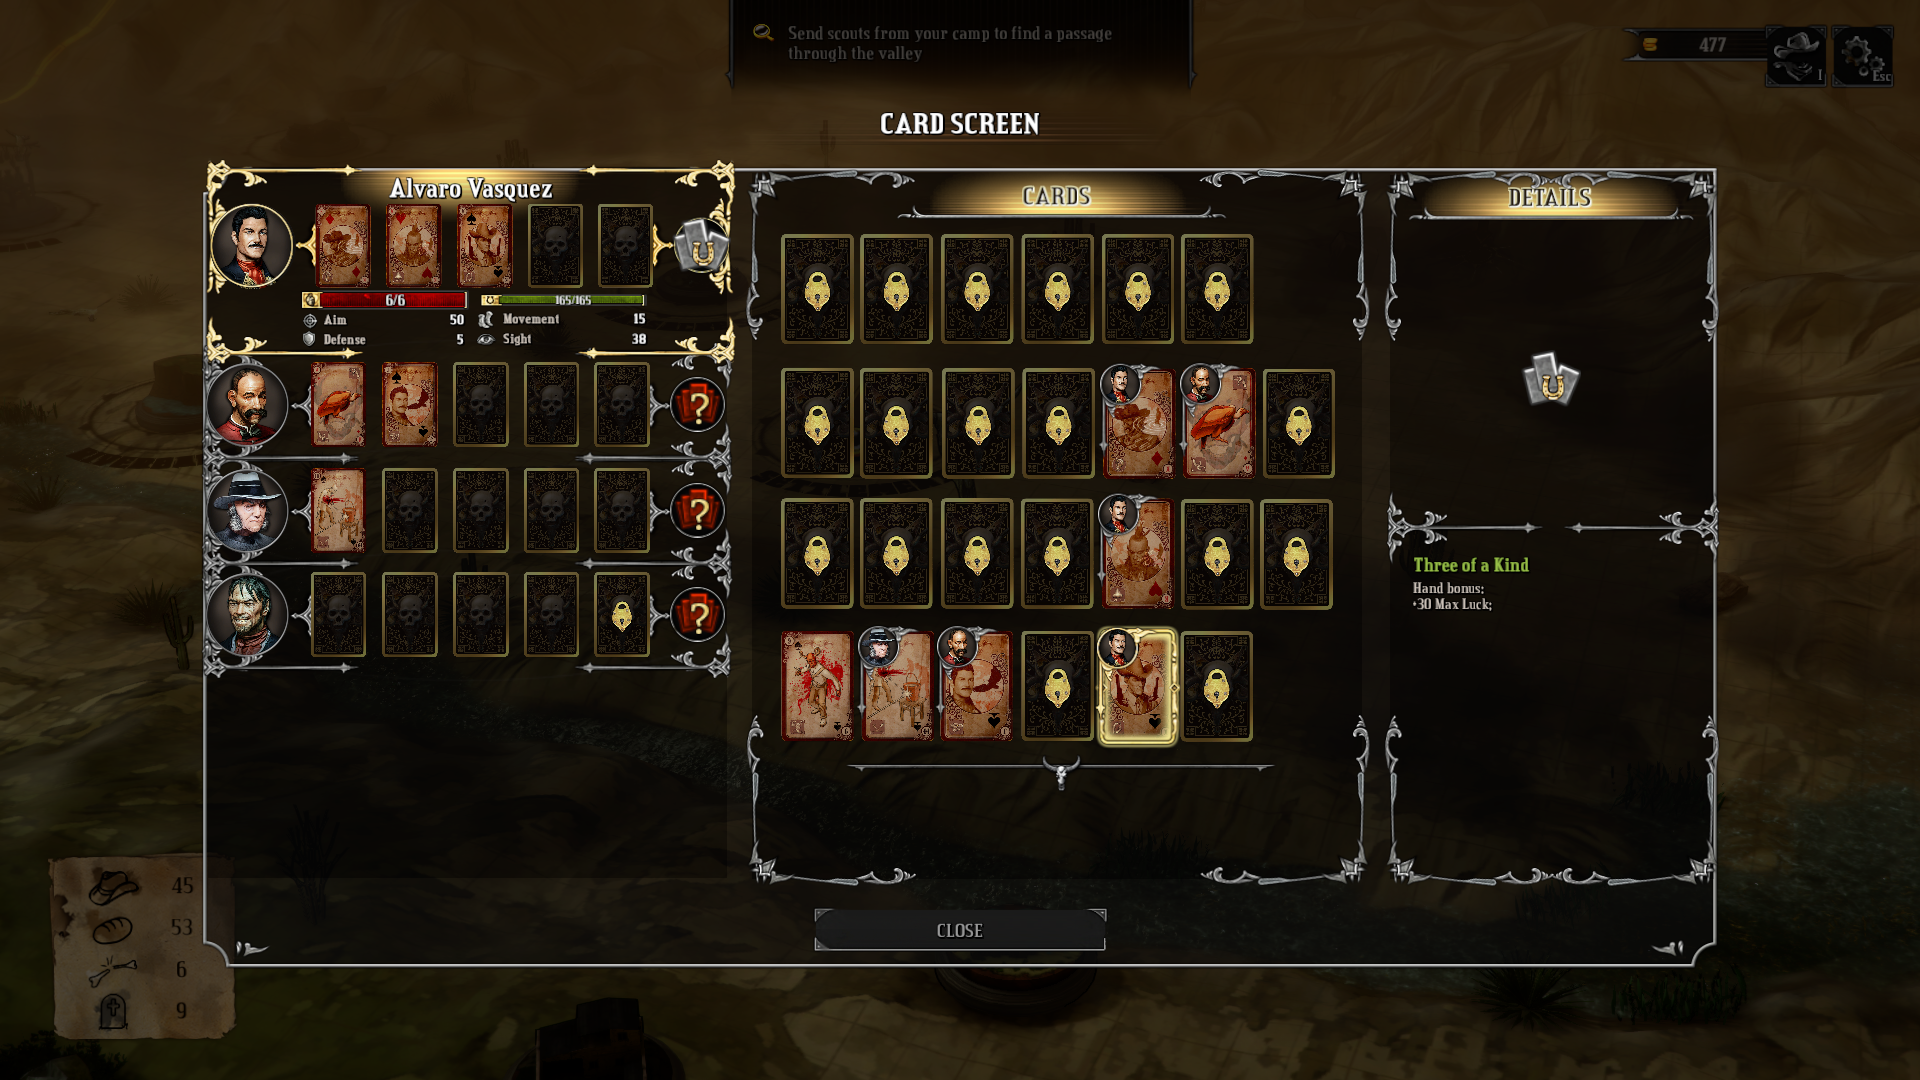
3. Cards
Through exploration, purchases, and simply just progressing through the story, you will unlock cards that can give characters access to new abilities either passively or actively. Some of these abilities give you more accuracy, or make you harder to hit. Others get a bit more fancy.
May favorite active abilities include Transfusion, where you exchange health with a target. It comes in handy when you’ve taken fire, yet haven’t hit the grave quite yet, and you want to show others your pain. Another good one is Golden Bullet, which always hits and shoots through all cover. It’s for those hard to reach places. For a good look at all of the cards and what they do, take a look at this really convenient graphic by Steam user CFG Remi.
When equipping cards to your characters, keep in mind the hand bonus you’ll get when given certain groups of cards. The Poker hand rules apply here, and generally speaking the better the hand, the better the bonus.

4. Afflictions
Should one of your characters get shot during a battle in Hard West, there’s a chance that they can sustain longer term injuries in the form of wounds. If they survive through that battle and the next with a wound, it will turn into a permanent handicap that sometimes provides both positive and negative adjustments to your character’s battle presence.
For example, a mangled foot sounds like a bummer, as it reduces your movement speed. Eventually, you learn to use your newfound hobble to your advantage, and it increases your defense and max HP when it becomes a Lame Leg. Struggling through a battle with your injury can pay off in later battles, but it’s also worth nothing that you can usually get them healed between fights. Depending on which fight you got it in, it may be worth doing so, as there are only 5 battles per scenario, and it takes two battles to make the injury worth keeping.
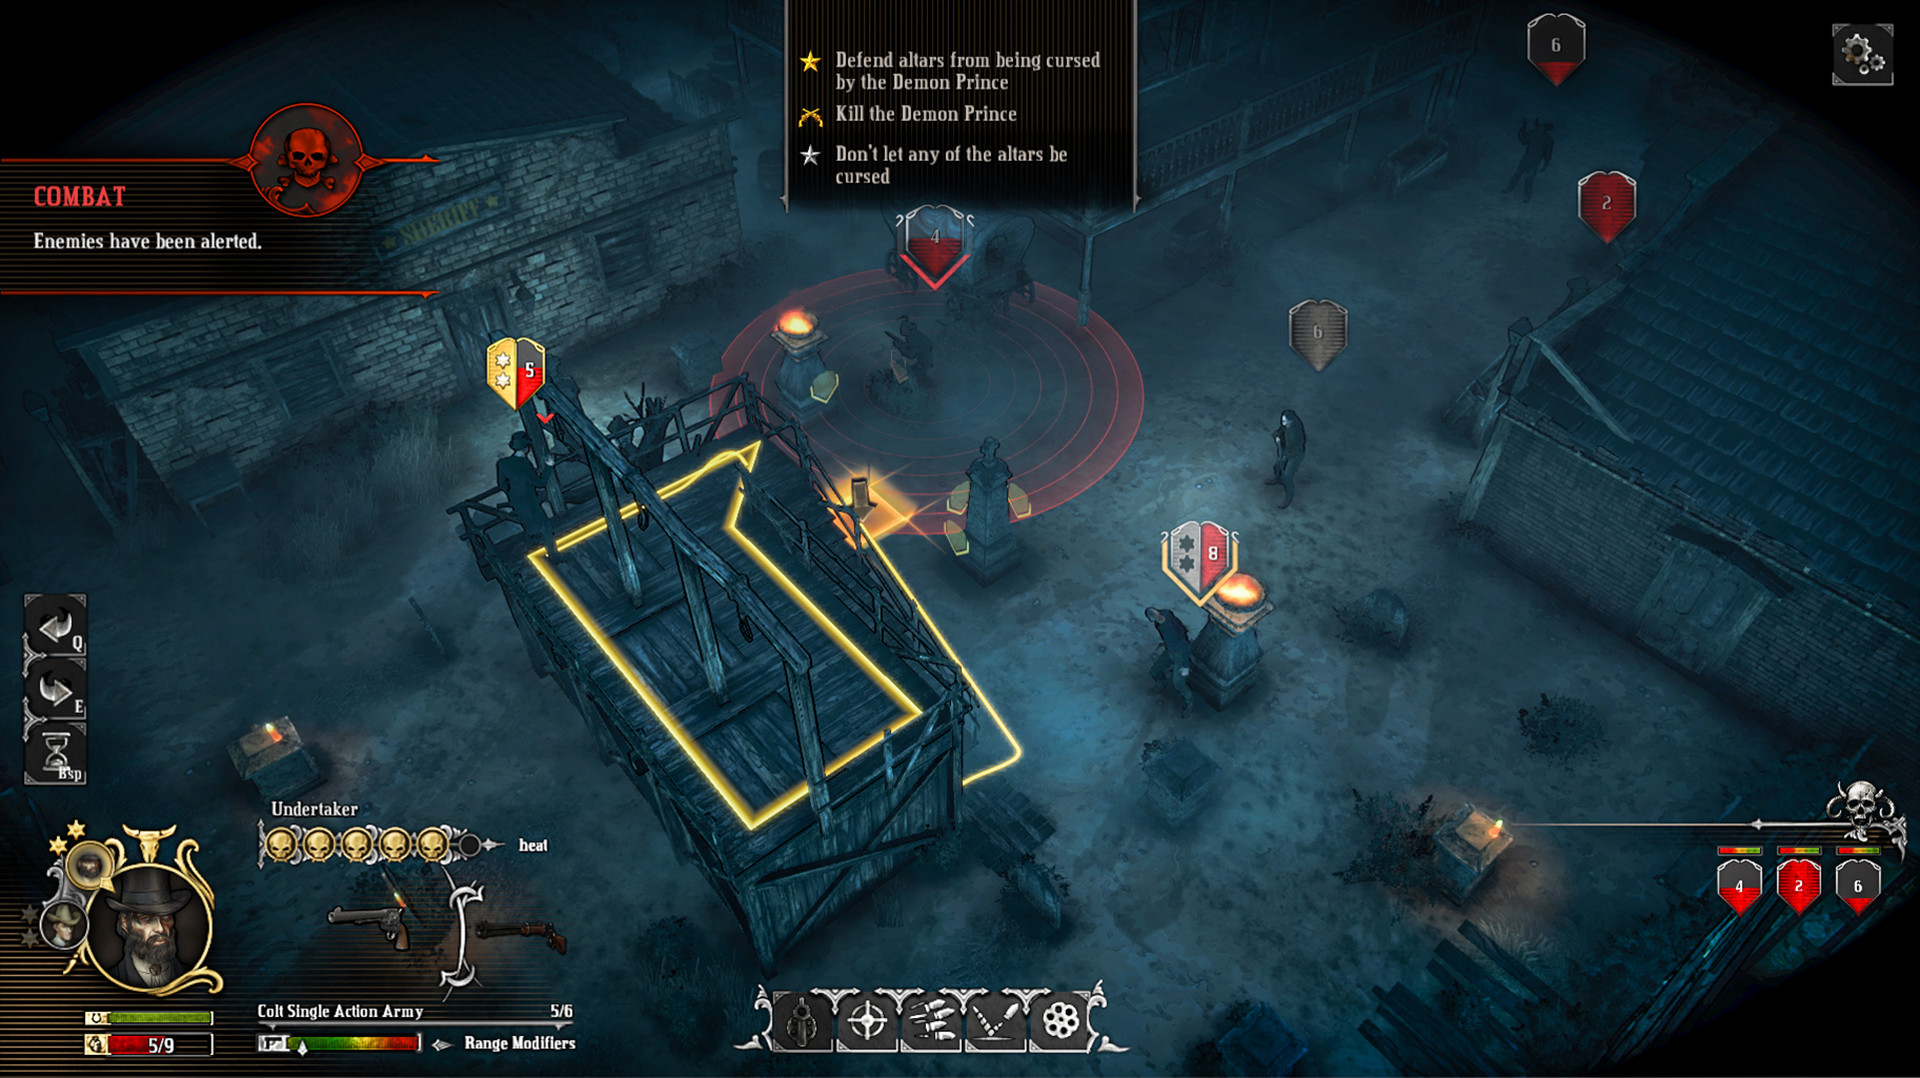
5. Reaction Shots
There is a really good reason to get super close to enemies in Hard West: the Point Blank bonus. When shooting an enemy within four tiles of you, your accuracy becomes 100%. This awesome bonus is one to strive for and would easily be the only thing worth achieving if it weren’t for the Reaction Shot. Sort of like Overwatch in XCOM, the Reaction Shot allows a unit to fire onto an encroaching unit during their turn. Coupled with how dangerous bullets are in general, and that you’re only ever a shot away from death or serious injury, the possibility of being shot on the move is enough to keep people from attempting more reckless maneuvers.
When you see a red circle surrounding an enemy, that is the range in which it will take an Reaction Shot against you, should you enter it. This only counts if the enemy has seen you before you moved into his range. If you approached from the flank, he wont take the shot. Your characters have reaction shot ranges, too, but the AI will rarely put themselves in a position to move into it if they know you are there.
Take these tips with you on your next trip out into the dusty darkness of Hard West. Be sure to stop by the Official Hard West Wiki for more insight, and tell us all about your travels on Twitter @CurseGamepedia.